# IdP Sync
IdP Sync in Tabnine implements automatic user provisioning and de-provisioning, replacing manual user management.
Tabnine offers an IdP sync functionality based on the SCIM 2.0 protocol. IdP Sync uses the SCIM Users API to manage new users and existing users. Changes made in the IdP (add/remove users) are reflected in Tabnine automatically.
IdP sync is available for Enterprise customers using either self-hosted (private) installations or Enterprise SaaS users (console.tabnine.com).
### User Types
All users are either “*registered*” (active) or “*deactivated*” (inactive). There are no hard deletes in the Tabnine system, so admins must deactivate a user (not delete).
{% hint style="info" %}
Tabnine plans to implement the SCIM Groups API in the near future for role and team management.
{% endhint %}
Newly synced users (users that have never been registered before) will receive an email upon registration, By default, they will be designated *registered users*.
Existing users will be synced by email match and given the status of synced users. Once they are synced, they can only be managed by the IdP and not manually.
{% hint style="danger" %}
Unrecognized users are those users that already exist in Tabnine but for some reason aren’t found in the IdP. This could be due to a misconfiguration in the IdP itself. These users continue to be managed manually.
{% endhint %}
### Team and Role Assignment
Team and role management is currently manual. Whenever a user is added to the system, that user has a default status of “member.”
Admins would assign new roles to users, such as “admin,” by changing the “member” status.
Team assignments are critical in Tabnine IdP Sync. Without a team assignment, the user *cannot* work.
Admins have the option to automatically assign new users to a default team so they can work immediately (and move them to a different team manually), or to leave them unassigned.
Admins may choose to leave users unassigned for different reasons, but an unassigned member still counts toward the number of licenses your organization uses with Tabnine.
{% hint style="warning" %}
We advise these team-less users not to be left that way in the long-term (if a member user is not active for the long-term, set that user to “deactivated”).
{% endhint %}
{% hint style="danger" %}
*Unsynced Users:* An error may occur where users not recognized by the IdP remain unchanged unless manually updated.
{% endhint %}
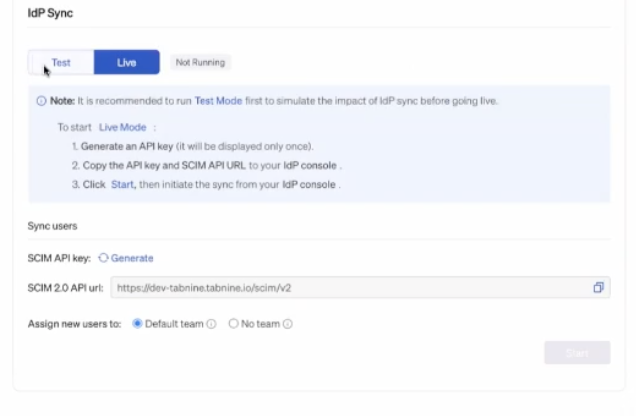
### Test Mode and Live Mode
IdP Sync can be set to either Test Mode or Live Mode. Live Mode will apply IdP updates in real time with sync happening continuously.
To push updates, ensure the IDP is properly configured. The first sync can take up to an hour.
It is a *best practice* to start with Test Mode. Ensure that your SCIM configuration is set properly.
Test Mode will simulate and preview changes in IdP Sync, but not apply them. If admins are satisfied with the preview, they can push the changes live.
### How to Set Up IdP Sync
Users must request activation from an account manager or Tabnine Support, as IdP Sync is not available by default.
Once given access, admins must follow the three following steps:
First, enable **IdP Sync** in the Admin Console, choosing **Test** or **Live**.
Next, generate SCIM API key.
### Configuring your Identity Provider for IdP Sync
Back in your IDP (Okta, Entra ID, etc.), add the 1) Tabnine SCIM URL and 2) API key.
#### Azure Entra ID
{% hint style="info" %}
*If you do not already have* an existing Tabnine application in Azure Entra ID, follow these instructions:
1. Set up an enterprise application. Navigate from:\
**Enterprise Applications > New Application > Create your own application**
2. Next, name it Tabnine and choose "**Integrate any other application you don't find in the gallery**."
{% endhint %}
Navigate to your Tabnine application.
Click on **Get Started** and then choose **Automatic**.
At this point, add a) the *Tabnine SCIM URL* ***and*** b) the *Tabnine-generated API key*.
Select **Test the connection**.
In the **Provisioning** section, select "**Sync only assigned users and groups."**
Once in place, hit **Start**.
**Provisioning**
Enter your [Azure Portal](https://azure.microsoft.com/en-us/get-started/azure-portal) and press **Sign In**.
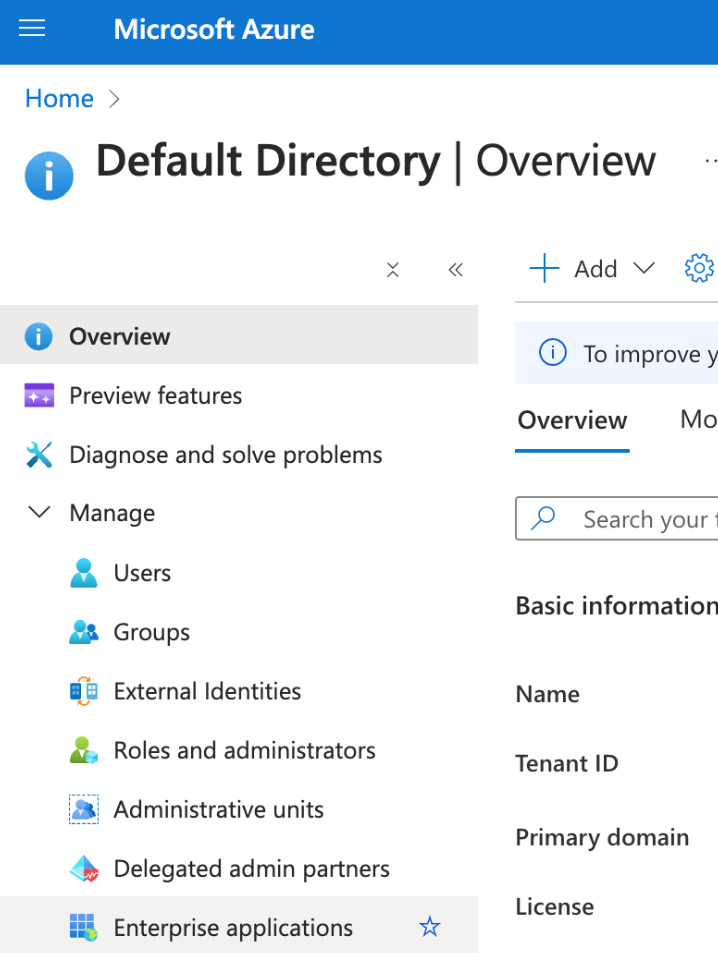
Next, under Azure Services, click the icon for Microsoft Entra ID:
On the lefthand side menu, click on the **Manage** dropdown and select **Enterprise applications**.
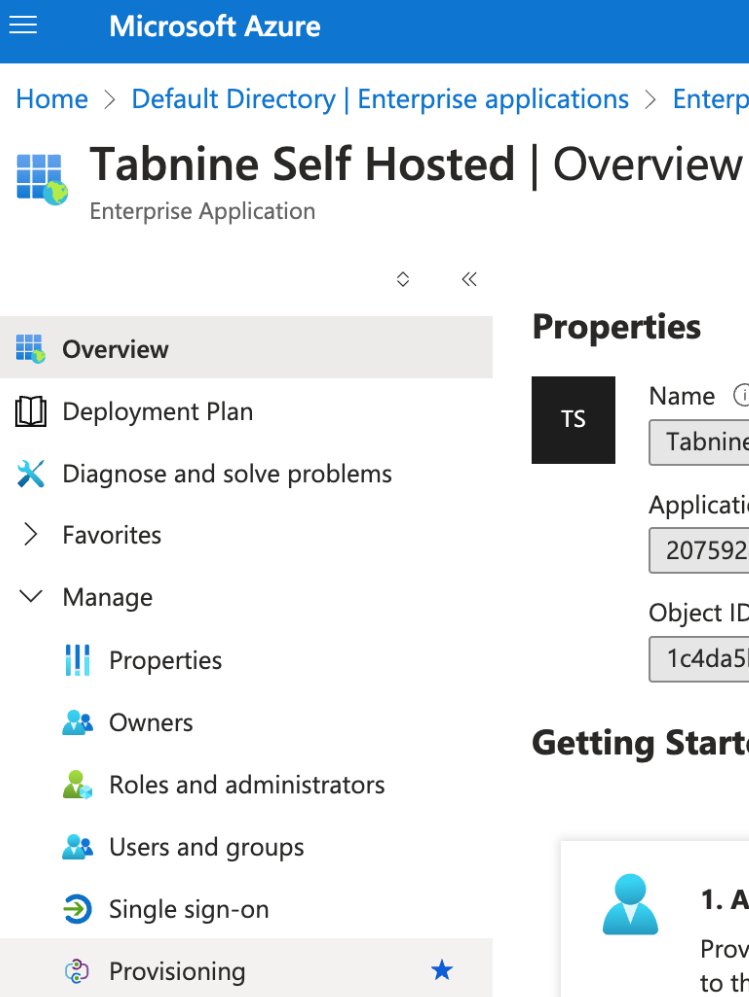
Next, choose **Tabnine Self Hosted.**
Within that application, go to the lefthand side menu and choose the **Manage** dropdown. Select **Provisioning**:
After that, go to New Configuration. Once there, enter your Tenant URL with the following format:
`baseUrl/scim/v2`
For example:
```
https://idp.tabnine.io/scim/v2
```
Retrieve a secret token by entering the following URL formula for creating it:
`baseUrl/organization/idp/scim-key`
Next, run **Test Connection**.
Then run **Create**.
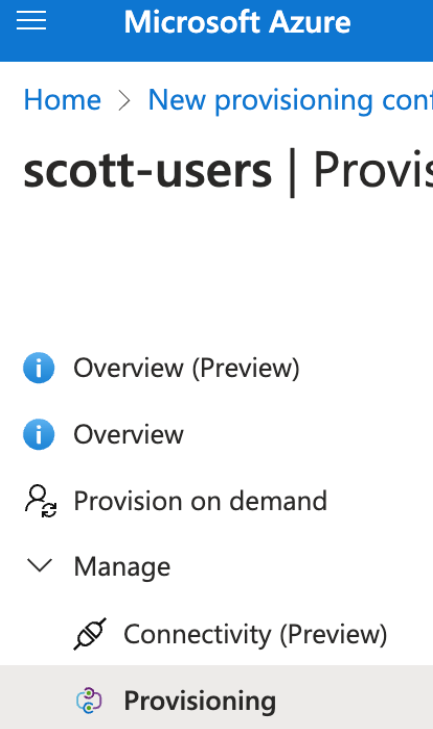
Under this new provisioning configuration, go to **Manage** and again to **Provisioning**.
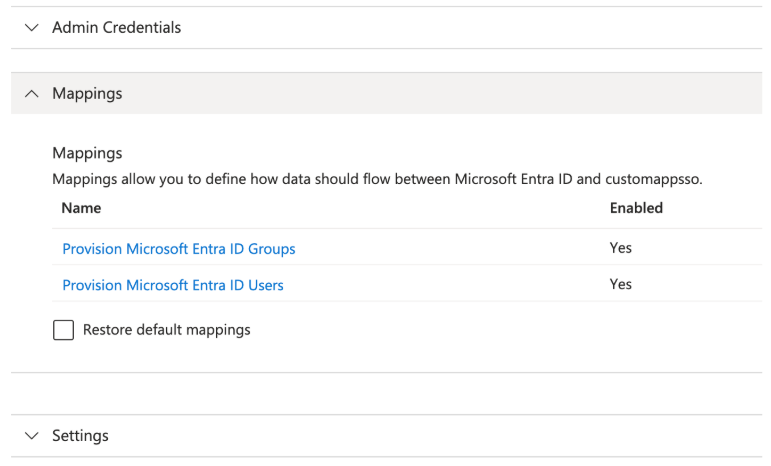
Open **Mappings** and select Provision Microsoft Entra ID Groups:
Set the **Enabled** column to **No** and hit **Save**.
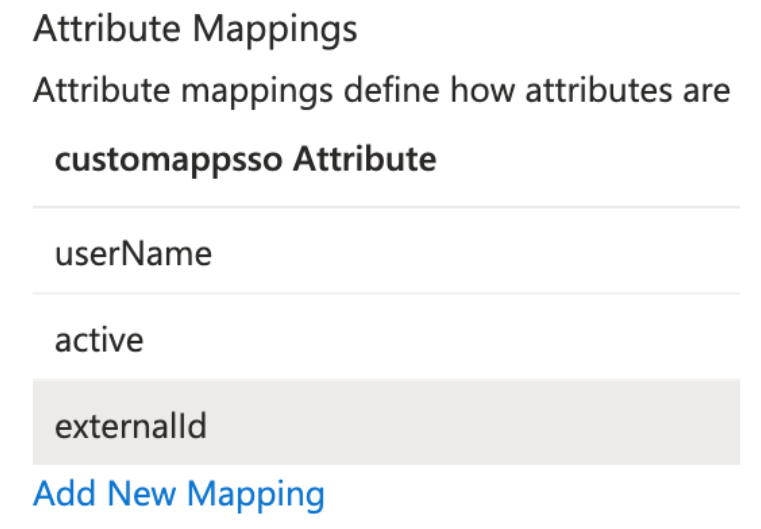
Then select Provision Microsoft Entra ID Users, where you will delete any mappings until you are left with the following configuration:
Click Save.
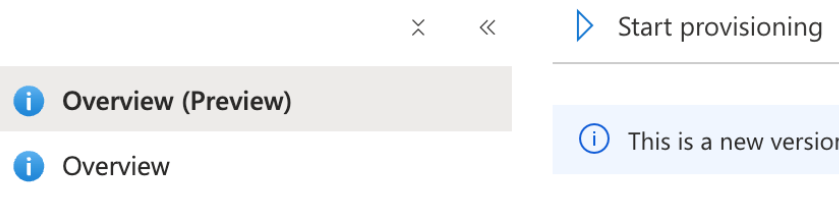
Finally, go back to ⓘ **Overview** and click **▷** Start provisioning:
#### Okta
Head over to Okta. On the lefthand side menu, select **Applications**, then select your Tabnine app.
Next, navigate from **General > App Settings > Edit**. Then, check off **Enable SCIM Provisioning** and hit **Save**.
Proceed to **Provisioning**.
Add your *Tabnine SCIM URL* under **SCIM connector base URL**.
Under **Authentication Mode**, Select "HTTP Header."
Now add your *Tabnine-generated API key* under **HTTP Header - Authorization**.
Once in place, hit **Save**.
{% hint style="info" %}
The sync cycle only starts when the IdP initiates it and the Tabnine SCIM service is running with a valid token. Syncs (e.g., from Entra ID) may take up to an hour.
{% endhint %}
### **Disabling IdP Sync**
When disabling IdP sync, admins can choose to convert all synced users to unsynced users, ***or*** deactivate all synced users.\\
.gif?alt=media)
 {% hint style="info" %}
*If you do not already have* an existing Tabnine application in Azure Entra ID, follow these instructions:
1. Set up an enterprise application. Navigate from:\
**Enterprise Applications > New Application > Create your own application**
2. Next, name it Tabnine and choose "**Integrate any other application you don't find in the gallery**."
{% endhint %}
Navigate to your Tabnine application.
Click on **Get Started** and then choose **Automatic**.
At this point, add a) the *Tabnine SCIM URL* ***and*** b) the *Tabnine-generated API key*.
Select **Test the connection**.
In the **Provisioning** section, select "**Sync only assigned users and groups."**
Once in place, hit **Start**.
**Provisioning**
Enter your [Azure Portal](https://azure.microsoft.com/en-us/get-started/azure-portal) and press **Sign In**.
Next, under Azure Services, click the icon for
{% hint style="info" %}
*If you do not already have* an existing Tabnine application in Azure Entra ID, follow these instructions:
1. Set up an enterprise application. Navigate from:\
**Enterprise Applications > New Application > Create your own application**
2. Next, name it Tabnine and choose "**Integrate any other application you don't find in the gallery**."
{% endhint %}
Navigate to your Tabnine application.
Click on **Get Started** and then choose **Automatic**.
At this point, add a) the *Tabnine SCIM URL* ***and*** b) the *Tabnine-generated API key*.
Select **Test the connection**.
In the **Provisioning** section, select "**Sync only assigned users and groups."**
Once in place, hit **Start**.
**Provisioning**
Enter your [Azure Portal](https://azure.microsoft.com/en-us/get-started/azure-portal) and press **Sign In**.
Next, under Azure Services, click the icon for