> For the complete documentation index, see [llms.txt](https://docs.tabnine.com/main/llms.txt). Markdown versions of documentation pages are available by appending `.md` to page URLs; this page is available as [Markdown](https://docs.tabnine.com/main/administering-tabnine/managing-your-team/settings/access-tokens.md).
# Personal Access Tokens
Tabnine supports Personal Access Tokens (PATs) for non-interactive authentication for APIs, scripts and integrations that call Tabnine services.
### **Generating a PAT**
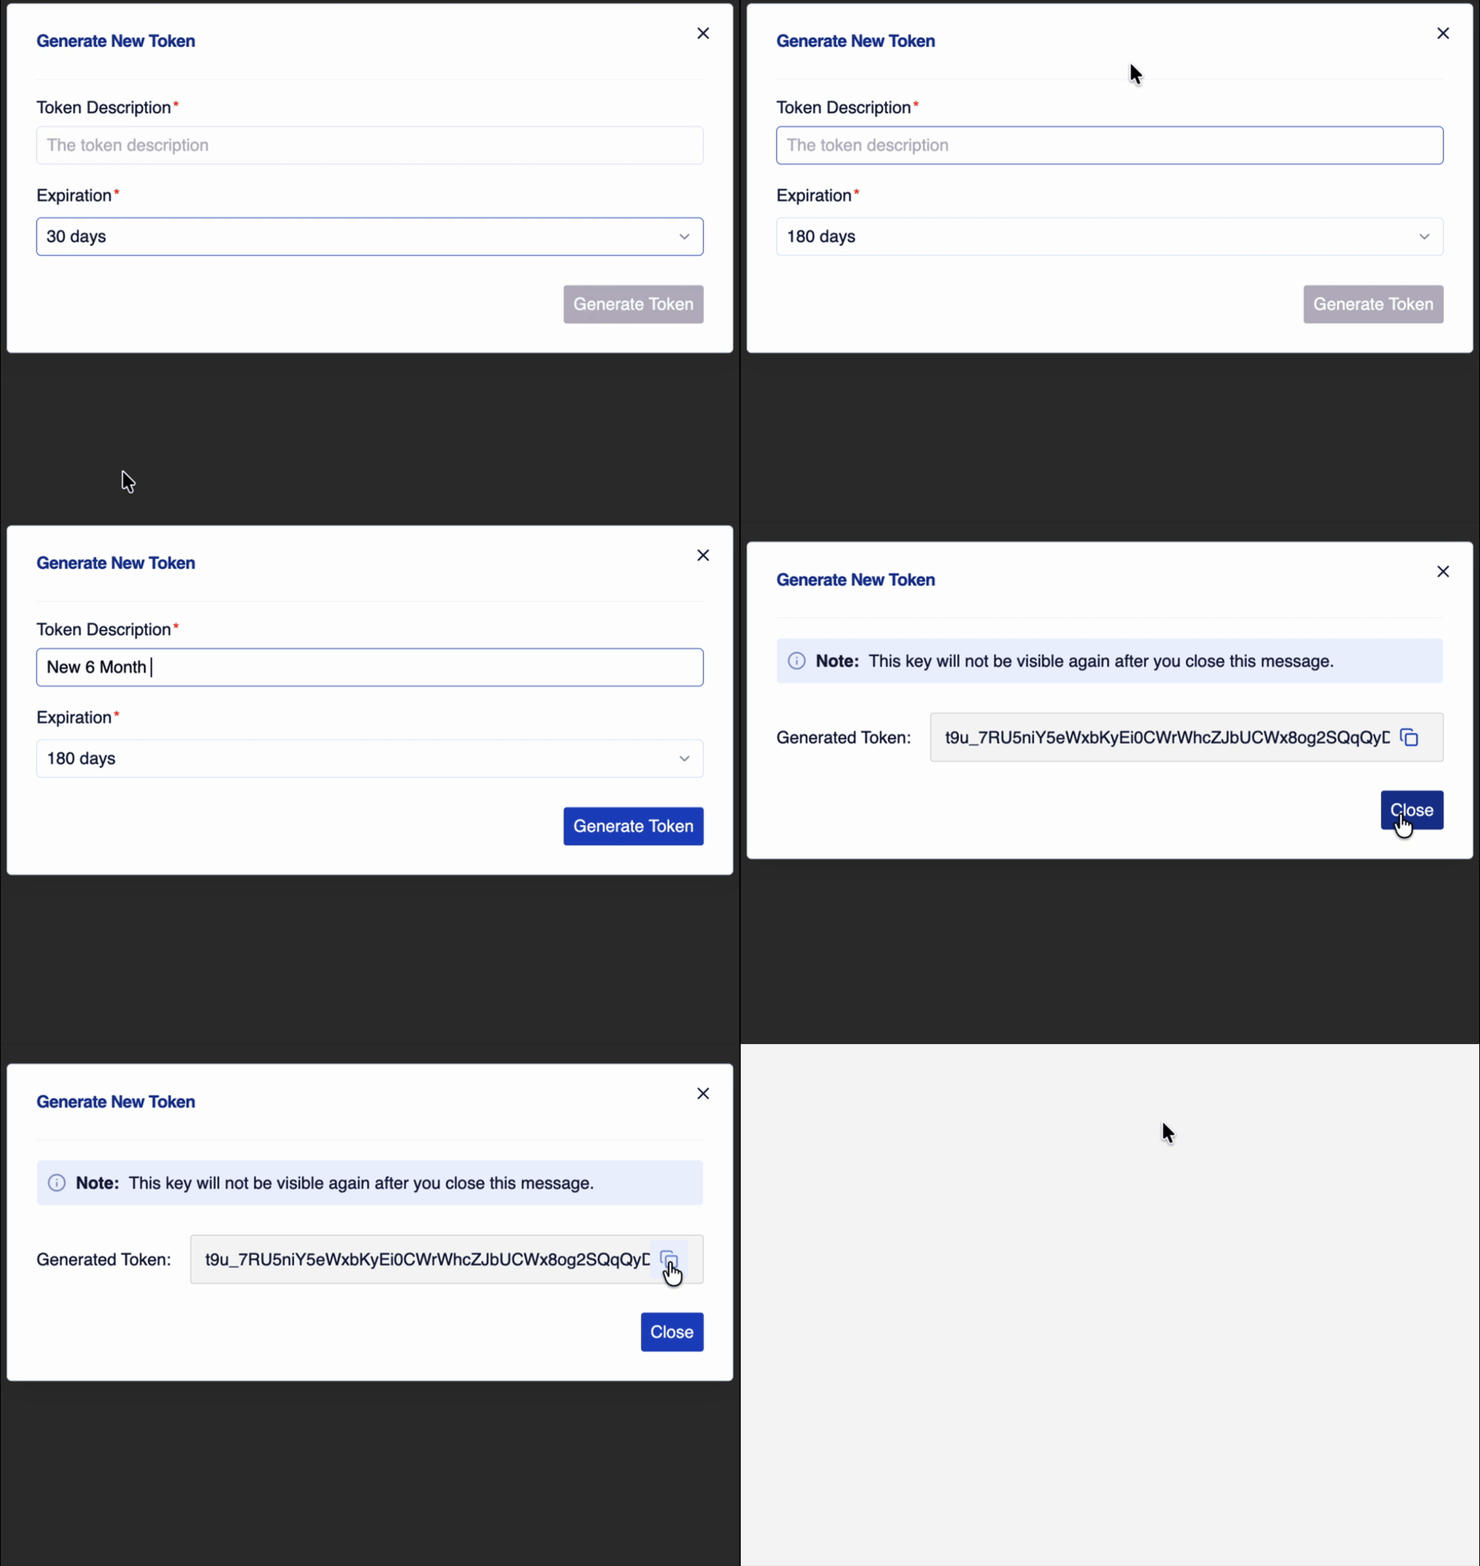
In the Admin Console, go to **Settings** on the lefthand-side menu and select **Access Tokens**. Then click **Generate Token**.
{% hint style="info" %}
Personal Access Token generation is not admin-only. Any user with a Tabnine account can create PATs by navigating to `[TABNINE_URL]/app/settings/access-tokens`.
{% endhint %}
Next, type in the name or purpose of the token, then select an expiration date option from the dropdown menu.
Under **Token access**, choose the permissions the token should have. Grant only what it needs:
* **API access** — enable individual API areas (Organization, Usage metrics, Audit logs, License and permissions, Users and teams, User management, Team repositories, Invitations) and pick **Read** or **Read + write** for each.
* **CLI / Agent access** — enable Tabnine CLI and agent capabilities (YOLO mode, Context Engine MCP, Coaching Guidelines MCP).
The token can't be generated until you select at least one access type. For the full list of areas and the endpoints they cover, see [Token scopes](/main/administering-tabnine/managing-your-team/tabnine-apis.md#token-scopes).
{% hint style="info" %}
**YOLO mode** lets the CLI auto-approve every tool call without review — grant it only for trusted automation. If your organization has turned YOLO off (**AI Features → Restrict YOLO mode**), the option is disabled here and any token still cannot use YOLO: the organization-wide setting always wins.
{% endhint %}
***Copy the token value*** and store it securely. Tabnine will not display it again. Then press **Close**.
## **Using a PAT in API calls**
Include the PAT as a bearer token in the Authorization header of your HTTP requests.
#### Example: cURL
```bash
#cURL example
curl -X GET "https:///api/v1/health" \
-H "Authorization: Bearer " \
-H "Content-Type: application/json"
```
#### Example: Node.js
```javascript
import fetch from "node-fetch";
const TABNINE_PAT = process.env.TABNINE_PAT;
const res = await fetch("https:///api/v1/health", {
headers: {
Authorization: `Bearer ${TABNINE_PAT}`,
"Content-Type": "application/json",
},
});
```
#### Example: Tabnine CLI (headless / non-interactive mode)
Set your PAT as `TABNINE_TOKEN`, then run prompts with `-p`:
{% tabs %}
{% tab title="macOS / Linux" %}
```bash
export TABNINE_TOKEN=""
# Simple text output
tabnine -p "Summarize the repo and list key entry points"
# JSON output (for automation)
tabnine -p "Extract a dependency list from package.json" --output-format json
```
{% endtab %}
{% tab title="Windows (PowerShell)" %}
```powershell
$env:TABNINE_TOKEN = ""
tabnine -p "Summarize the repo and list key entry points"
tabnine -p "Extract a dependency list from package.json" --output-format json
```
{% endtab %}
{% endtabs %}
For more automation patterns, see [Non-Interactive Mode](/main/getting-started/tabnine-cli/getting-started/quickstart.md#non-interactive-mode).
Use the same pattern for any internal Tabnine API endpoint (admin automation, reporting, or integration scripts).
### Access Token List
A list of all active tokens will display on the Access Tokens page, noting:
* Status
* Permissions (the scopes granted to the token; hover for the full list)
* Creation Date
* Expiration Date
* The last time it was used (including noting if it is still “Never Used”)
### Revoking Tokens
In the final column on the same list, you have the option to revoke the token’s access by pressing **`Revoke`**. This will also eliminate it from the list of tokens.
---
# Agent Instructions
This documentation is published with GitBook. GitBook is the documentation platform designed so that both humans and AI agents can read, navigate, and reason over technical content effectively. Learn more at gitbook.com.
## Querying This Documentation
If you need additional information that is not directly available in this page, you can query the documentation by asking a question.
Perform an HTTP GET request on the following URL with the `ask` and `goal` query parameters:
```
GET https://docs.tabnine.com/main/administering-tabnine/managing-your-team/settings/access-tokens.md?ask=&goal=
```
`ask` is the immediate question: it should be specific, self-contained, and written in natural language.
`goal` is what the user is ultimately trying to achieve, the reason they need the answer. Sharing it helps GitBook give you a better, more relevant answer. A goal is most helpful when it describes the outcome the user wants rather than restating the question. For example, with `ask=how do I create an API token`, a goal like `automate deployments from our CI pipeline` lets GitBook tailor the answer to that use case.
The response will contain a direct answer to the question and relevant excerpts and sources from the documentation.
Use this mechanism when the answer is not explicitly present in the current page, you need clarification or additional context, or you want to retrieve related documentation sections.