> For the complete documentation index, see [llms.txt](https://docs.tabnine.com/main/llms.txt). Markdown versions of documentation pages are available by appending `.md` to page URLs; this page is available as [Markdown](https://docs.tabnine.com/main/administering-tabnine/managing-your-team/settings/general-settings/idp-sync.md).
# IdP Sync
IdP Sync in Tabnine implements automatic user provisioning and de-provisioning, replacing manual user management.
IdP Sync in Tabnine implements automatic user provisioning and de-provisioning, replacing manual user management.
Tabnine offers an IdP sync functionality based on the [SCIM 2.0 protocol.](/main/administering-tabnine/managing-your-team/settings/general-settings/idp-sync/tabnine-scim-api.md) IdP Sync uses the SCIM Users API to manage new users and existing users. Changes made in the IdP (add/remove users) are reflected in Tabnine automatically.
IdP sync is available for Enterprise customers using either self-hosted (private) installations or Enterprise SaaS users (console.tabnine.com).
### User Types
All users are either “*registered*” (active) or “*deactivated*” (inactive). There are no hard deletes in the Tabnine system, so admins must deactivate a user (not delete).
{% hint style="info" %}
The SCIM Groups API is supported in Users and Groups sync mode. See Sync Types below.
{% endhint %}
Newly synced users (users that have never been registered before) will receive an email upon registration, By default, they will be designated *registered users*.
Existing users will be synced by email match and given the status of synced users. Once they are synced, they can only be managed by the IdP and not manually.
{% hint style="danger" %}
Unrecognized users are those users that already exist in Tabnine but for some reason aren’t found in the IdP. This could be due to a misconfiguration in the IdP itself. These users continue to be managed manually.
{% endhint %}
### Sync Types
#### Users Only
This mode syncs user lifecycle only — no group or team sync. The admin can choose to add new users to a default team or to no team.
Behavior:
* New user in IdP → added as a registered user in Tabnine
* Existing user in IdP → becomes a synced user
* User removed/disabled in IdP → deactivated in Tabnine
* Users not found in IdP → remain manually managed
Restrictions:
* Synced users are fully managed by the IdP
* User management actions are blocked in the UI (cannot activate/deactivate manually, cannot modify sync-controlled attributes)
Team assignment is not synced and is managed manually in Tabnine.
#### Users and Groups
In addition to user lifecycle, this mode syncs IdP groups to Tabnine teams.
Behavior:
* All "Users Only" behavior applies
* Each IdP group is mapped to a Tabnine team by name and becomes an available team for the user
Team rules:
* A user's active team must be one of the allowed teams from the IdP
* If it is not, Tabnine will automatically switch the active team to a valid one
Restrictions:
* Synced teams cannot be renamed or deleted
* Team membership is managed only via the IdP
### Team and Role Assignment
Team and role management is currently manual. Whenever a user is added to the system, that user has a default status of “member.”
Admins would assign new roles to users, such as “admin,” by changing the “member” status.
Team assignments are critical in Tabnine IdP Sync. Without a team assignment, the user *cannot* work.
Admins have the option to automatically assign new users to a default team so they can work immediately (and move them to a different team manually), or to leave them unassigned.
Admins may choose to leave users unassigned for different reasons, but an unassigned member still counts toward the number of licenses your organization uses with Tabnine.
{% hint style="warning" %}
We advise these team-less users not to be left that way in the long-term (if a member user is not active for the long-term, set that user to “deactivated”).
{% endhint %}
{% hint style="danger" %}
*Unsynced Users:* An error may occur where users not recognized by the IdP remain unchanged unless manually updated.
{% endhint %}
### Test Mode and Live Mode
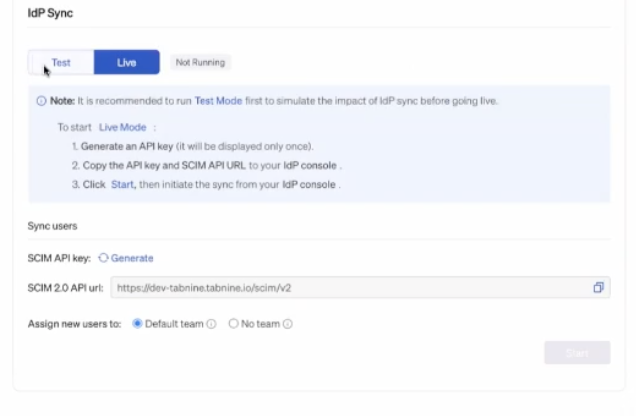
IdP Sync can be set to either Test Mode or Live Mode. Live Mode will apply IdP updates in real time with sync happening continuously.
To push updates, ensure the IDP is properly configured. The first sync can take up to an hour.
It is a *best practice* to start with Test Mode. Ensure that your SCIM configuration is set properly.
Test Mode will simulate and preview changes in IdP Sync, but not apply them. If admins are satisfied with the preview, they can push the changes live.
### How to Set Up IdP Sync
Users must request activation from an account manager or Tabnine Support, as IdP Sync is not available by default.
Once given access, admins must follow the three following steps: First, enable IdP Sync in the\
Admin Console, choosing the Mode (Test or Live) and the Sync Type (Users Only or Users and Groups).
First, enable **IdP Sync** in the Admin Console, choosing **Test** or **Live**.
Next, generate SCIM API key.
### Configuring your Identity Provider for IdP Sync
Back in your IDP (Okta, Entra ID, etc.), add the 1) Tabnine SCIM URL and 2) API key.
#### Azure Entra ID
{% hint style="info" %}
*If you do not already have* an existing Tabnine application in Azure Entra ID, follow these instructions:
1. Set up an enterprise application. Navigate from:\
**Enterprise Applications > New Application > Create your own application**
2. Next, name it Tabnine and choose "**Integrate any other application you don't find in the gallery**."
{% endhint %}
Navigate to your Tabnine application.
Click on **Get Started** and then choose **Automatic**.
At this point, add a) the *Tabnine SCIM URL* ***and*** b) the *Tabnine-generated API key*.
Select **Test the connection**.
In the **Provisioning** section, select "**Sync only assigned users and groups."**
Once in place, hit **Start**.
**Provisioning**
Enter your [Azure Portal](https://azure.microsoft.com/en-us/get-started/azure-portal) and press **Sign In**.
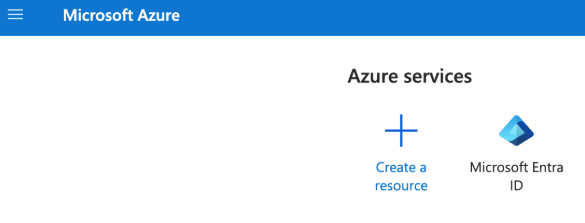
Next, under Azure Services, click the icon for Microsoft Entra ID:
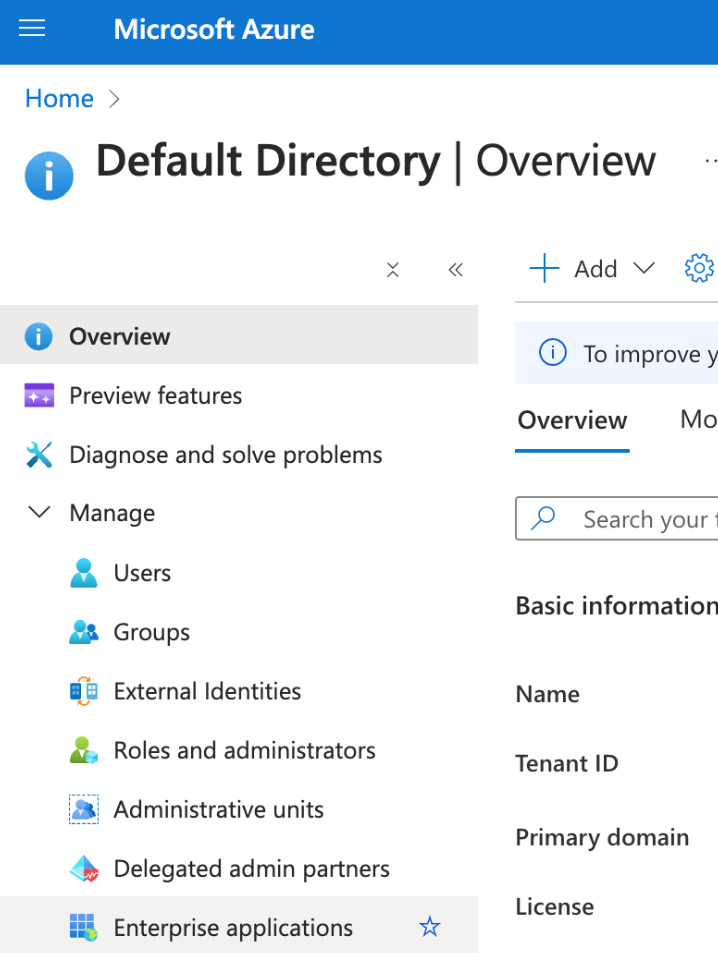
On the lefthand side menu, click on the **Manage** dropdown and select **Enterprise applications**.
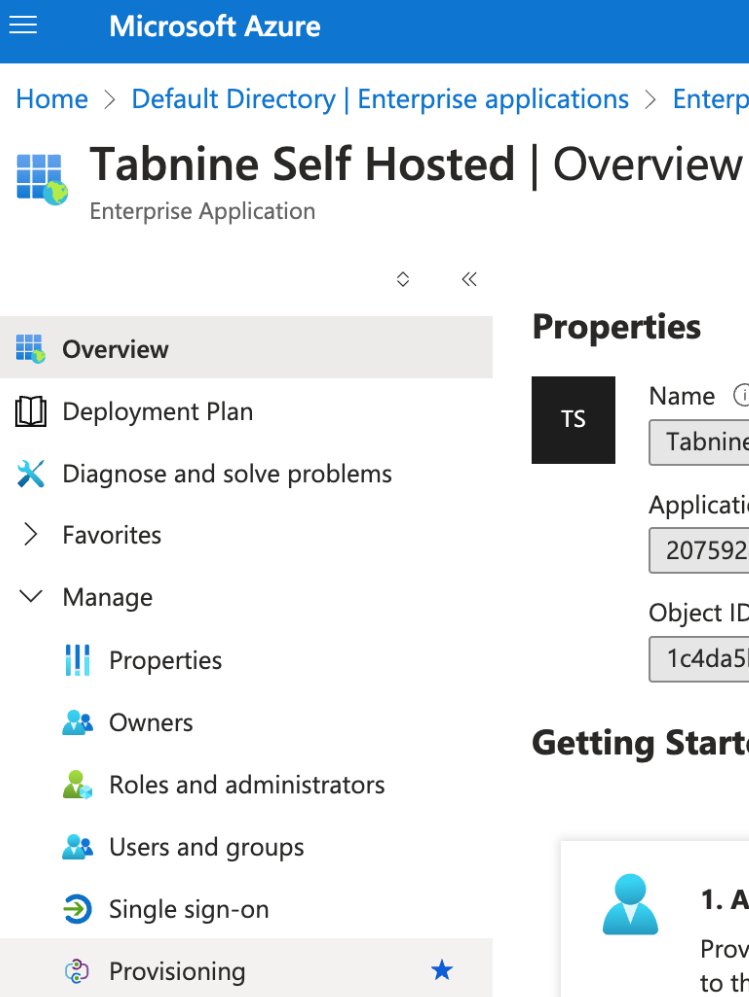
Next, choose **Tabnine Self Hosted.**
Within that application, go to the lefthand side menu and choose the **Manage** dropdown. Select **Provisioning**:
After that, go to New Configuration. Once there, enter your Tenant URL with the following format:
`baseUrl/scim/v2`
For example:
```
https://idp.tabnine.io/scim/v2
```
Retrieve a secret token by entering the following URL formula for creating it:
`baseUrl/organization/idp/scim-key`
Next, run **Test Connection**.
Then run **Create**.
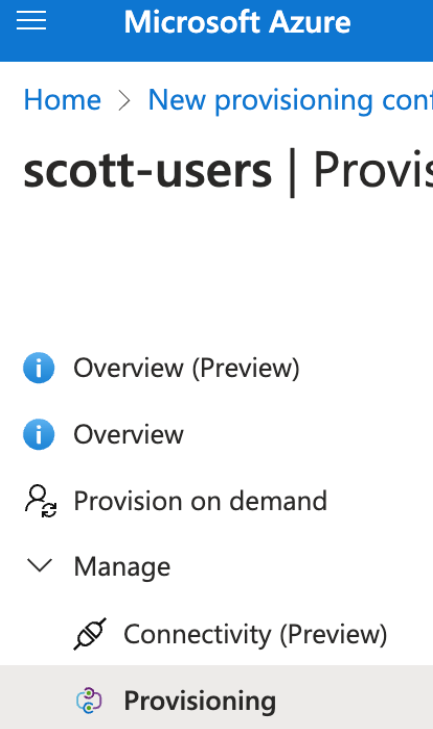
Under this new provisioning configuration, go to **Manage** and again to **Provisioning**.
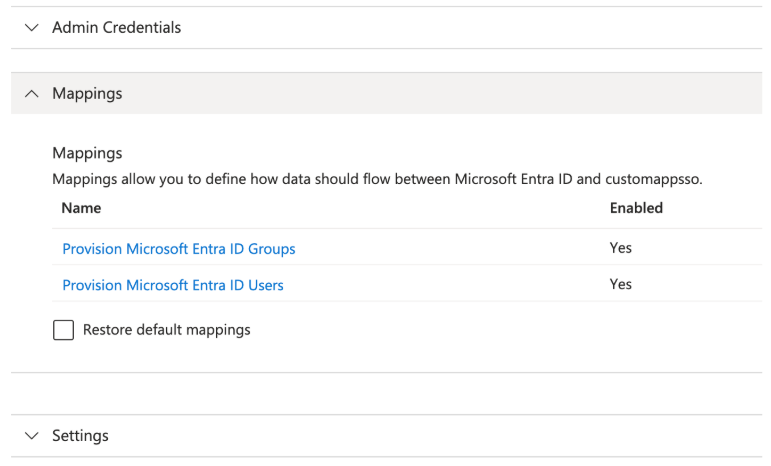
Open **Mappings** and select Provision Microsoft Entra ID Groups:
Set the **Enabled** column to **No** and hit **Save**.
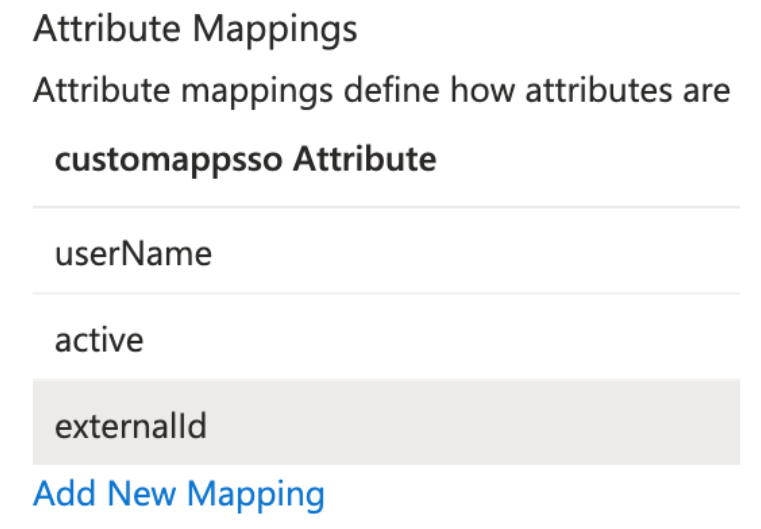
Then select Provision Microsoft Entra ID Users, where you will delete any mappings until you are left with the following configuration:
Click Save.
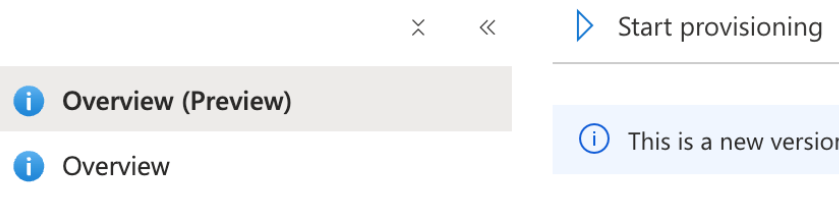
Finally, go back to ⓘ **Overview** and click **▷** Start provisioning:
#### Okta
Head over to Okta. On the lefthand side menu, select **Applications**, then select your Tabnine app.
Next, navigate from **General > App Settings > Edit**. Then, check off **Enable SCIM Provisioning** and hit **Save**.
Proceed to **Provisioning**.
Add your *Tabnine SCIM URL* under **SCIM connector base URL**.
Under **Authentication Mode**, Select "HTTP Header."
Now add your *Tabnine-generated API key* under **HTTP Header - Authorization**.
Once in place, hit **Save**.
{% hint style="info" %}
The sync cycle only starts when the IdP initiates it and the Tabnine SCIM service is running with a valid token. Syncs (e.g., from Entra ID) may take up to an hour.
{% endhint %}
### **Disabling IdP Sync**
When disabling IdP sync, admins can choose to convert all synced users to unsynced users, ***or*** deactivate all synced users.\\
---
# Agent Instructions
This documentation is published with GitBook. GitBook is the documentation platform designed so that both humans and AI agents can read, navigate, and reason over technical content effectively. Learn more at gitbook.com.
## Querying This Documentation
If you need additional information that is not directly available in this page, you can query the documentation by asking a question.
Perform an HTTP GET request on the following URL with the `ask` and `goal` query parameters:
```
GET https://docs.tabnine.com/main/administering-tabnine/managing-your-team/settings/general-settings/idp-sync.md?ask=&goal=
```
`ask` is the immediate question: it should be specific, self-contained, and written in natural language.
`goal` is what the user is ultimately trying to achieve, the reason they need the answer. Sharing it helps GitBook give you a better, more relevant answer. A goal is most helpful when it describes the outcome the user wants rather than restating the question. For example, with `ask=how do I create an API token`, a goal like `automate deployments from our CI pipeline` lets GitBook tailor the answer to that use case.
The response will contain a direct answer to the question and relevant excerpts and sources from the documentation.
Use this mechanism when the answer is not explicitly present in the current page, you need clarification or additional context, or you want to retrieve related documentation sections.
.gif?alt=media)
 {% hint style="info" %}
*If you do not already have* an existing Tabnine application in Azure Entra ID, follow these instructions:
1. Set up an enterprise application. Navigate from:\
**Enterprise Applications > New Application > Create your own application**
2. Next, name it Tabnine and choose "**Integrate any other application you don't find in the gallery**."
{% endhint %}
Navigate to your Tabnine application.
Click on **Get Started** and then choose **Automatic**.
At this point, add a) the *Tabnine SCIM URL* ***and*** b) the *Tabnine-generated API key*.
Select **Test the connection**.
In the **Provisioning** section, select "**Sync only assigned users and groups."**
Once in place, hit **Start**.
**Provisioning**
Enter your [Azure Portal](https://azure.microsoft.com/en-us/get-started/azure-portal) and press **Sign In**.
Next, under Azure Services, click the icon for
{% hint style="info" %}
*If you do not already have* an existing Tabnine application in Azure Entra ID, follow these instructions:
1. Set up an enterprise application. Navigate from:\
**Enterprise Applications > New Application > Create your own application**
2. Next, name it Tabnine and choose "**Integrate any other application you don't find in the gallery**."
{% endhint %}
Navigate to your Tabnine application.
Click on **Get Started** and then choose **Automatic**.
At this point, add a) the *Tabnine SCIM URL* ***and*** b) the *Tabnine-generated API key*.
Select **Test the connection**.
In the **Provisioning** section, select "**Sync only assigned users and groups."**
Once in place, hit **Start**.
**Provisioning**
Enter your [Azure Portal](https://azure.microsoft.com/en-us/get-started/azure-portal) and press **Sign In**.
Next, under Azure Services, click the icon for  Microsoft Entra ID: