# Single Sign-On (SSO)
## Single Sign-On
Single Sign-On (SSO) lets your users authenticate to Tabnine using your existing identity provider (IdP). You can configure SSO using either SAML or OAuth 2.0 / OpenID Connect, depending on what your IdP supports. Each organization can use one of these protocols at a time (SAML or OAuth 2.0, not both).
### How To Configure Single Sign-On
In the Tabnine Admin Console, go to **Settings**, then **General**.
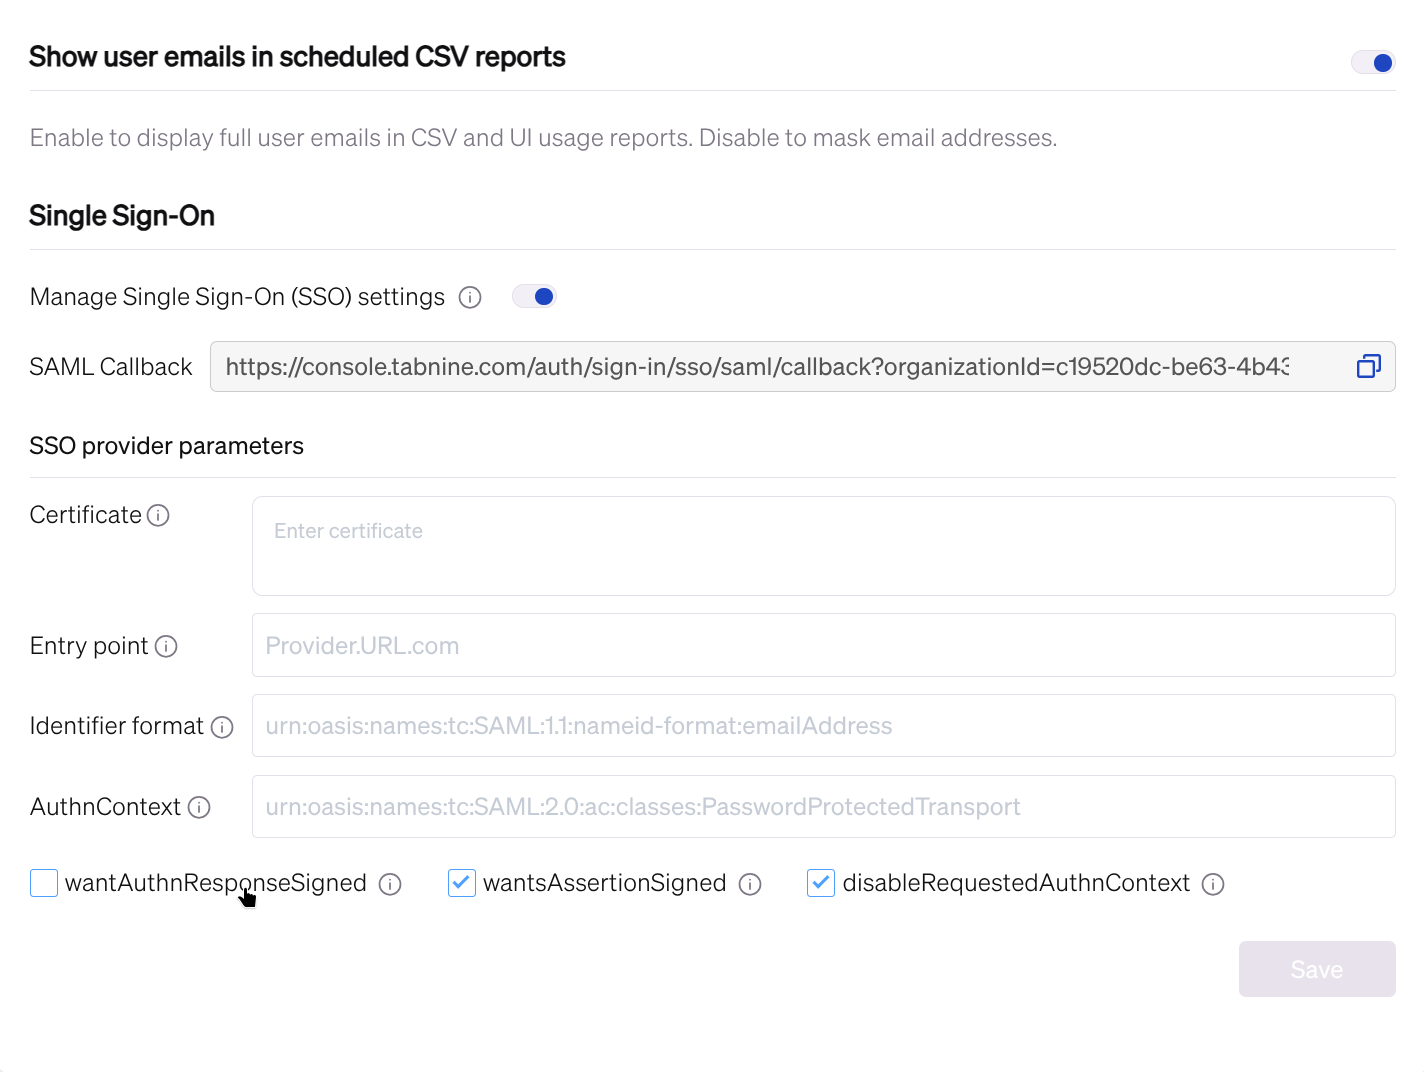
Next, open the **Single Sign-On** section and toggle Enable Single Sign-On (SSO) on.
Then, under **SSO Protocol**, choose either **SAML** or **OAuth 2.0**.
{% tabs %}
{% tab title="Configuring SAML" %}

When **SAML** is selected as your SSO protocol:
1. Copy the **SAML Callback** URL from the Tabnine console.
2. In your IdP (for example Azure AD or Okta), paste this URL into the SAML application as the **Reply URL / Assertion Consumer Service URL (ACS)**.
3. In the Tabnine console, fill in the following **SAML provider parameters** with values from your IdP:
* **Certificate** – the IdP’s X.509 certificate (Base64‑encoded).
* **Entry point** – the IdP’s SAML SSO / login URL.
* **Identifier format** (optional) – the SAML NameID format your IdP uses (for example, email address).
* **AuthnContext** (optional) – the authentication context class your IdP requires.
“Identifier format” refers to the name identifier format of the request your IdP expects.\
“`AuthnContext`” specifies the authentication mechanism and level of assurance the IdP should use.
4. (Optional) Adjust the SAML flags if required by your IdP:
* **`wantAuthnResponseSigned`**
* **`wantsAssertionSigned`**
* **`disableRequestedAuthnContext`**
5. Click **Save**.
{% endtab %}
{% tab title="Configure OAuth 2.0" %}
###
When OAuth 2.0 (supported since [6.0.0](https://docs.tabnine.com/main/release-notes#v6.0.0)) is selected as your SSO protocol:
1. Copy the OAuth Redirect URI from the Tabnine console.
2. In your IdP / OAuth provider, paste this URI into the application configuration as the Redirect URI / Callback URL.
3. In the Tabnine console, fill in the following OAuth provider parameters with values from your IdP:
* **Client ID** – the application’s client identifier.
* **Client Secret** – the application’s client secret.
* Auth URL – the authorization endpoint URL (for example, `https://provider.com/oauth/authorize`).
* **Token URL** – the token endpoint URL.
* **User Info URL** – the user info endpoint URL (if your provider uses one).
* **Scopes** (optional) – used when retrieving the user’s identity
* For example, `openid email profile` (used by default) is used when using OpenID Connect.
4. Expand **Advanced Settings** and configure:
* **Email Claim** (optional) – the field in the token that contains the user’s email (for example, `email` or `upn`).
* **Name Claim** (optional) – the field that contains the user’s display name (for example, `name`).
* **Resource** (optional) – a resource / audience value if your IdP requires it.
* **Custom CA Cert** (optional) – a Base64‑encoded CA certificate if your IdP uses a custom CA.
5. Click **Save**.
{% endtab %}
{% endtabs %}
After saving, test logging in via SSO to make sure the email and name claims map correctly to your Tabnine users.
### Use Azure as a SAML IdP
1. Enter .
2. After logging into Azure, go to the **Azure Active Directory** tab.
3. Select **Enterprise applications** service.
4. Choose **New application.**
5. Choose **Create your own application.**
6. Choose **Non-gallery application.** (Integrate any other application you don't find in the gallery.)
7. Name it (for example, "TabnineSSO") and click **Add.**
8. Choose **Setup single sign-on**.
9. Select **SAML-based Sign-on** as the SSO mode.
10. Next, add the Tabnine service provider details to the configuration in Azure. Set the following values in **Identifier (Entity ID)** and **Reply URL (Assertion Consumer Service URL),** replacing **tabnine.customer.com** with your Tabnine cluster domain:\\
11. Choose **user.mail** as the value for **Unique User Identifier:**\\
12. In Section 3 - SAML Certificates, choose **Download certificate (Base64).**
13. In Section 4, copy **Login URL** **value** to use in the next step.
14. Finally, make sure the following are checked at the bottom:\
\&#xNAN;**☑ wantsAssertionSigned** and **☑ disableRequestedAuthnContext**
Be sure to have checked off ☑ wantsAssertionSigned and ☑ disableRequestedAuthnContext for Azure configurations
### Use Okta as a SAML IdP
1. Enter your Okta admin panel in **Applications > Create App Integration > SAML2 integration.**
2. Set an App name (e.g., "Tabnine"):\\
3. Next, set the following values:\
\
**Single sign-on URL:** *https\://**tabnine.customer.com**/auth/sign-in/sso/saml/callback*\
\
**Audience URI (SP Entity ID):** *https\://**tabnine.customer.com**/auth/sign-in/sso/saml*\
\
**Name ID format:** `EmailAddress`\
\
\&#xNAN;*NOTE: Replace **tabnine.customer.com** with your Tabnine cluster domain.*\\
4. Choose 🔵 **I'm an Okta customer adding an internal app.**\\
5. In the created App in Okta ("Tabnine"), Sign on tab, copy **Sign on URL** value and **Signing Certificate** values.


 Use Azure as a SAML IdP
1. Enter
Use Azure as a SAML IdP
1. Enter .webp?alt=media)
.webp?alt=media)

.webp?alt=media)
.webp?alt=media)
.webp?alt=media)